Some simple jobs aren’t really so simple, and are more involved than they at first seem to be. For example, installing and removing bike pedals isn’t difficult, but you need to know how or you’ll do damage. Tamia shows you the way to do it.
______________________________
by Tamia Nelson | April 7, 2018
Pedals are important. Very important. They join your feet to your bike, and since your legs are the pistons that drive the wheels, this is no small matter. Yet despite their vital role, pedals appear to be simple devices. Don’t be fooled. There’s a lot about pedals that doesn’t meet the eye, beginning with the way they’re fastened to the crank arms.
Why would you want to know this? These are the reasons why…
- Pedals loosen, and a loose pedal can destroy a costly aluminum crank in just a few hours, leaving you stranded in the process.
- Pedals need regular maintenance, and you have to remove them to maintain them. And…
- …many new bikes come without any pedals fitted, requiring that you fit them yourself, unless you hire someone to do it.
This being the case, let’s see what it takes to fit new pedals, or tighten one that has loosened in use.
First, though, here’s a brief …
Anatomy Lesson. Don’t worry. It’s safe for work. And you can tell the boss that it won’t take up much of your time, either. I’ll limit my discussion to the sort of pedal I have on all my bikes — a close cousin of the pedals that used to come on almost every “quality” bike, whether it was a touring bike or a racing machine. These were variously known as “rat-trap” pedals or “quill” pedals (or sometimes just pedals), and they were intended to be used with toe clips. Nowadays, of course, many cyclists prefer “clipless” pedals, most of which look nothing at all like a pedal. Not to my eyes, anyway. But if you ride clipless, you’re either (1) a more “serious” cyclist than I am, (2) a richer cyclist than I am, or (3) a masochist, and whichever of these is true, you probably don’t need (or want) my help.
Now, the Anatomy Lesson that I promised:
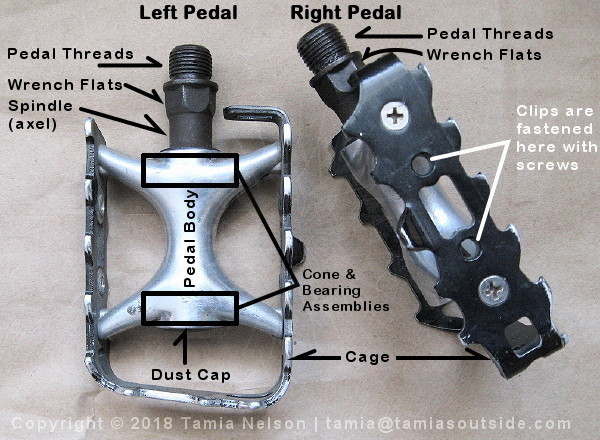
That was painless, wasn’t it? The external anatomy of quill pedals is pretty straightforward. Probably the only thing that requires comment is the question of proper fit — What size pedal should I get for my bike? — and even this is reasonably easy to dispose of. Almost all pedals sold today have 9/16-inch spindles (call them axles, if you must) with 20 TPI threads. In other words, one size fits (almost) all.
There is a darker side to pedals, however. Pedals, like shoes and gloves, come in pairs, and the members of a pair are NOT interchangeable. But we’ll come to that in a moment, after we …
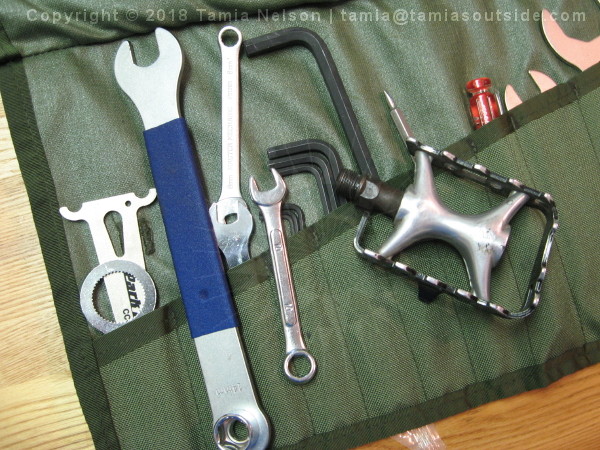
Assemble Our Tools and Materials. You’ll need a wrench. It’s best to use a purpose-made pedal wrench, but if you don’t have one handy you can probably get by with a 15 mm open-end wrench — or even an adjustable wrench, if the jaws aren’t too broad.
And what if you don’t have either one? Then you need to tool up. The photo below shows an old Nashbar bicycle tool kit. Similar kits are offered by many retailers, and they contain most of the tools you’ll need for everyday maintenance chores. The blue handle is on a combination tool. One end — the upper end in the photo — is a pedal wrench; the other, a 14 mm socket for crank bolts.
I mentioned materials, didn’t I? So I did. Outfit yourself with a couple of pedal washers, if you can find them. Pedals should be screwed tight to the crank arms, and in getting them tight, the hard steel of the pedal spindle invariable gouges the face of the softer aluminum crank. Pedal washers go between crank arm and pedal, and they limit the damage done by the spindle. The other material you’ll want is plain old grease. (Petroleum jelly will do fine here.) Why do you need grease? Because water — particularly salt water — can work its way into the microscopic gap between the male thread on the spindle and the female thread on the crank arm, where it acts as an electrolyte, facilitating the process of galvanic corrosion and ultimately “welding” spindle to crank. This turns any subsequent attempt at removal into an unnecessarily heroic challenge. Luckily, the remedy is simple: Just grease the threads of the spindle before installing any pedal. I told you it was simple.
Tools and materials at the ready? Then let’s …
Get to Work! Inspect your new pedals to determine which is right and which is left. How can you tell? They’ll be marked, usually on the end of the spindle. The maker of the pedals pictured below decided to leave nothing to chance, however. He marked his pedals in two places — the wrench flats and the spindle end. Note the capital letter L stamped into each place:
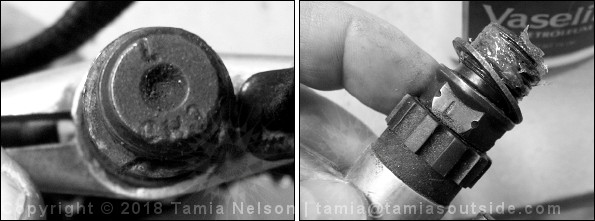
Why is this important? Because, as I’ve already mentioned, pedals aren’t interchangeable. The threads on the right-hand (drive-side) pedal are conventional. You tighten the pedal to the crank by turning the spindle clockwise. BUT… The threads on the left crank defy convention: They screw the other way. (Perhaps this article isn’t safe for work, after all.) In other words, to tighten your left-hand pedal down, you turn the spindle counterclockwise.
And no, this isn’t an example of some ancient idiosyncrasy that somehow fossilized into convention. It has a sound engineering basis. (See the “Pedal Threading” section in the late Sheldon Brown’s article on bicycle pedals.)
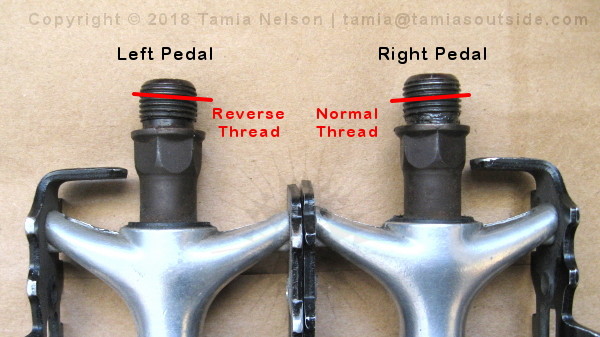
Once you’re sure you can tell right from left, the rest is easy. Slip a pedal washer over the end of each spindle and grease the threads. (NB: The pedal washer should be flush against the spindle seat. I angled it in the photo below to make it stand out.) Don’t stint on the grease (right photo in diptych above). You can wipe off any excess later.
Now start screwing the spindle into the crank. Use a light touch. You’re threading hard steel into soft aluminum. A properly aligned spindle will turn easily at first. You can do the job with your fingers. But if you encounter resistance at the start, and you then try to overcome this resistance with force, you’ll almost certainly cross-thread the crank. Once you’ve done that, the pedal will be impossible to fit securely, and the only cure will be a new crank. It won’t be cheap.
So… Easy does it. And remember:
Do it Right! The right-hand (drive-side) pedal tightens normally. Turn the spindle clockwise. But as I’ve already noted, the left-hand spindle is contrary. It tightens counterclockwise. Confused? Then commit the following ditty to memory. It applies on either side, right or left:
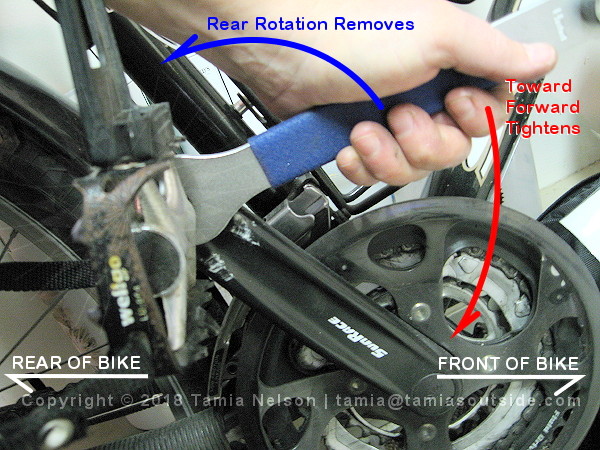
Got it? Good. We’re on the home stretch. All that remains now is to …
Finish the Job. Do the right-hand pedal first. Then the left, remembering that “Toward forward tightens” on both sides. Once you’ve turned the spindles as far as you can with your fingers, bring your pedal wrench into play. You want the spindles screwed tight against the crank arms. This is not a time to be shy. You want things TIGHT. But not TIGHT. You don’t have to jump up and down on the wrench handle.
Have you tightened both spindles against their cranks? Then there’s nothing left to do but wipe up any excess grease. Then go for a ride. You’ll know if you got it right after you’ve ridden a few hours. If you start feeling a slight knock with each revolution of the crank, it’s likely that one of your newly installed pedals has loosened. The remedy? Tighten it. Right now. Don’t wait till you get home. And use a little more muscle than you did the last time. (Since there’s no way to tighten a loose pedal without a wrench, and since a wobbly spindle can destroy the threads in a crank in short order, I’d recommend that you bring a pedal wrench or adjustable wrench with you on any long ride.)
Do I have to add that loosening pedals — to maintain them or replace them, say — is just the opposite of tightening them? I didn’t think so. And since it’s nearly impossible to cross-thread a crank while removing a properly installed pedal, the job is even easier. If you remembered to grease the threads when you put the pedal on, that is. You did remember, didn’t you?

